


How to Create Animated GIFs in GIMP
We’ve all seen amazing Kickstarter pages for board games that include incredible GIFs showing you exactly how to play the game. It looks like something that would (or should) cost a lot of money to produce, but actually they’re pretty easy for creators to put together themselves.
The example I have included below is a fairly simple one, created for the upcoming Kickstarter campaign of Runika and the Six-sided Elements.

For this use of animated GIF, I needed a way to demonstrate how dice were moved around the board, how the elemental disk could rotate, and how rune cards matched up to dice on the board – all in one GIF.
It appears a little janky, because I skipped a number of frames in order to keep filesize down, and that brings me to the most important part of an animated GIF:
An animated GIF needs to be small in size.
It’s easy to create a beautiful, movie-like GIF. But it’s going to be really hard for every potential backer of your Kickstarter to download a 15MB file to their phone (which is likely where they will be watching it from).
The image above is about 1MB in size, and I’ll include a tip later for how to keep your files small.
So, without further waffling, here is how you make your own animated GIF…
1. Gather your tools.

GIMP (or GNU image manipulation program; GNU being an open-source software like Unix, but Not Unix) is essentially “free Photoshop”. It can function a lot like Adobe Photoshop, but it runs quicker, has fewer advanced features, and most importantly is free.
You can download GIMP here.
If you are unfamiliar with the system, take a look at a few resources to get familiar. But essentially, the tools you are going to make the most use of are: Move (used to move layers around), …. and that’s it. There are also the Rotate and Scale tools used to manipulate your layers, but they will be important later.

2. Go to File > New and pick an image size that works for you.
Remember, smaller image sizes are generally better for keeping your filesize small. Kickstarter has a width limit of 680 pixels so I’d recommend going with that, and then picking a height that works for you.
3. Import your pieces.
 Now you want to go to Windows Explorer and grab all of the image files you need, then drag them onto your open GIMP document. I would recommend using the Create a New Layer Group button (see the image on the right) to create a new group of layers. Name that group “Resources” or something similar.
Then select that group before you drag your files in. This should import all of your image files into an easily hide-able group.
You should see a little eyeball to the left of your new Group (or any layer, actually). You can click on this eyeball to hide individual layers, or the whole Group. This is very useful!
Now I would recommend going through and renaming all of your pieces. This will help you not go insane later on when you have hundreds of duplicate parts.
Okay, so now you have all of your bits, it’s time to make your first image. This is your foundation – it is the image that your entire GIF will be based around.
4. Create a new layer group and name it “1”.
Right now, the layer group is empty. So you will need to fill it with things for your foundation image. Go to your Resources layer group and right-click on any pieces you need. Select “Duplicate Layer” and then drag the duplicate into your “1” layer group.
All of the bits are now in the right layer group, so now you need to use the Move and Scale tools (mentioned above) to put them all in the right position.

Once everything is in the right position, it’s time to do the animating.
5. Create your second frame.
Right click on your “1” layer group and say “Duplicate Layer”. Rename this new layer group “2”. Now, click on the eyeball to the left of your “1” layer group to hide it. Only your “2” layer group should be visible now.
Use the Move tool to move parts around. Remember, this is only 1 frame later, so things won’t move too much or they will appear jumpy. In my example at the top of this page, the dice are moved 52 pixels right and 26 pixels up in their first diagonal “being picked up” movement, then 78 pixels right when they are “moving”, then 10 pixels when they are being “pushed” around the player board. If that’s too jumpy for you, use fewer pixels. If it’s too slow for you, use more. (In my example above, I think the card that comes in at the end moves too quickly. When I redo that, I will slow it down.)

Remember that you are imitating “movement” in real life. As such, you might want to make your dice move like they would in real life. For example, look at how I moved the red dice. I probably could have made its path a little smoother, actually, but I wanted to put this one together quickly.
You can always click the eyeballs on each layer in turn to see the “path” of your pieces.
6. Create all of your frames.
In my example above, I went frame-by-frame, animating only one object in each new layer group. I used the Move tool primarily, using the up/down/left/right arrow keys on my keyboard to count the movements of the pieces. You can also hold down Shift while clicking an arrow key to move it by a larger amount.
To make my pieces rotate, I used the Rotate tool. Again, you can hold down Control on your keyboard while rotating to get it to snap to a specific angle. I rotated the disk 15 degrees each frame in my example.
7. Rotating, resizing and glowing.

If you have any pieces rotating, I suggest copying the original unrotated image each frame and rotating it by a greater degree each time. Rotating (or scaling) pieces makes them blurry. If you always rotate the original image, you will only lose ~5% sharpness on the original image. If you rotate a rotated image, you will end up with 5% of 5% of 5% of 5% etc of loss of sharpness. It’s not much, but you can see how the right-most image (rotated from the original) preserves more sharpness.
The same goes for resizing/scaling any pieces.
If you want pieces to “glow”, you can add a new layer and use the Paintbrush tool. Change its colour to white, adjust its Size however you like, and change its brushstroke to the most feathered edges. Click once on your new layer to add the “glow” effect.

If you want pieces to “disappear”, then you can just go to the Layer window, and when you select that particular layer, reduce its opacity by a fraction. In my example, I faded things out by 20% each time until they went from 100% opacity to 0%.
8. Exporting the frames.
Now that all of your pieces are in place, you will need to export them. (There may be a quicker or easier way to do this, but I have not learned it. Feel free to email me if you know better!)
Click the eye on any visible layer groups you have, so that they are all hidden. Then, make “1” layer group visible. This should be your first frame.
Go to File > Export and save it into a new folder as “1.png”.
Then make “2” layer group visible and hide your “1” layer group.
Repeat exporting this, but as “2.png”. Continue doing this until you have exported all of your frames. My animation above has 62 frames in it.
9. Creating the animation.
 Save your working document as an .xcf and then close it. Then, open your “1.png” and resave it as “Animation.xcf”. Go to File > Open As Layers and select all of your frames. Make sure that they are ordered in your Layers window from 1 at the bottom to your last frame at the top.
You can see on the right there how my file goes from 62 at the top in descending order to 58, then presumably to 1 at the bottom.
In my example, I also used a little “p” in the filenames to indicate where I wanted the animation to pause a little. There is a way to mess around with the speed yourself, but we’re going to let GIMP do the hard work for us (see step 11).
For now, every frame that you want to repeat/pause, right click on it and say “Duplicate Layer”.
Now you get to see what your animation looks like.
10. Testing the animation.
Go to Filters > Animation > Playback. This will open a new window, which allows you to see the animation at 10 frames per second. There is a dropdown option there to change it to 12fps or more. Traditional animation is at 24fps, so I wouldn’t go above the 25fps option.
Remember, the more frames per second, the smoother it will look, but the quicker your animation will go. The quicker and smoother it goes, the larger file size it will need to be. My animation example is at 10fps, and I think for a Kickstarter example that’s just fine.
If there is anything wrong or off about your animation, you will see it now. Go back to step 6 and fix the frames you need to fix. For complex animations, you might want to test it periodically, as changing frame 4 means you will probably also have to change frames 5 and onwards.
11. Optimising your animation.
If you exported this as a GIF now, it would be huge. So we’re going to ask GIMP to delete some layer data. This is the tip to making file size small that I mentioned earlier.
First, we’re going to get GIMP to change the frame rate of certain panels. Wherever you’ve duplicated layers to show a pause, we are now going to delete those duplicates.
Go to Filters > Animation > Optimize (Difference).
This will create a new document, with file names that look like this: “1.png(100ms)(combine)”. You will also notice that the layers are missing some information. This is because, when a GIF animates, it will act as though only layer 1 is visible, then frame 2 will have layers 1 and 2 visible, then frame 3 will have layers 1 to 3 visible, and so on. It deletes extra data, in other words.

 You can fiddle around with the (100ms) in the layer name if you like. This will adjust how long the frame lasts (100ms is 100 milliseconds, or 10 frames per second). Your previously duplicated frames should now just be a single frame with 200ms or more in their layer name.
Test your animation again like in step 10, then one final optimization…
Go to Filters > Animation > Optimize (for GIF). This will create a new document again.
Test your animation again, then…
12. Save your file.
Go to File > Export… and change the filename to “[filename].gif”, where [filename] is whatever you want it to be.
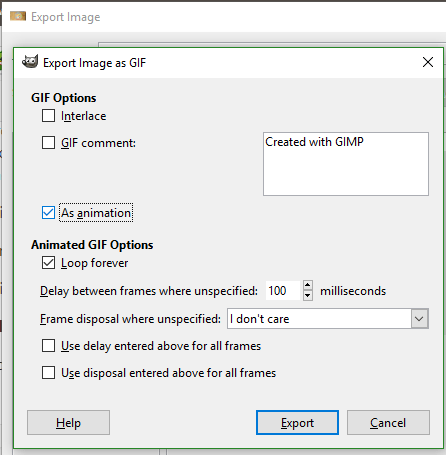
Make sure you tick “As animation” and “Loop forever” and then export it.
And done. That’s your GIF. It won’t have as many colours as a .png file, so it won’t be as pretty. But it will be animated.
13. Double check on your image.
Before you go to the trouble of uploading this to Facebook or Kickstarter, remember to click on your image and open it to make sure it looks okay! Also, remember to check how big the image file size is, so you haven’t created some kind of monster 10GB file that nobody will ever be able to see. 🙂
That’s it. Hopefully that is helpful!
Additional notes…
You can also animate videos this way. What you will need to do is have a video (say, you rolling dice), and “Print Screen” it frame by frame. Import each frame into GIMP, and set each up as a layer, same as above, then optimize it and export.
You must be logged in to post a comment.